How to Assess Vehicle Damage for Insurance Claims
After an accident, documenting vehicle damage accurately is critical for a fair insurance claim. Reviewing car accident guides can help you navigate the process. Many drivers miss hidden issues, leading to reduced payouts. Follow these steps to ensure you’re prepared:
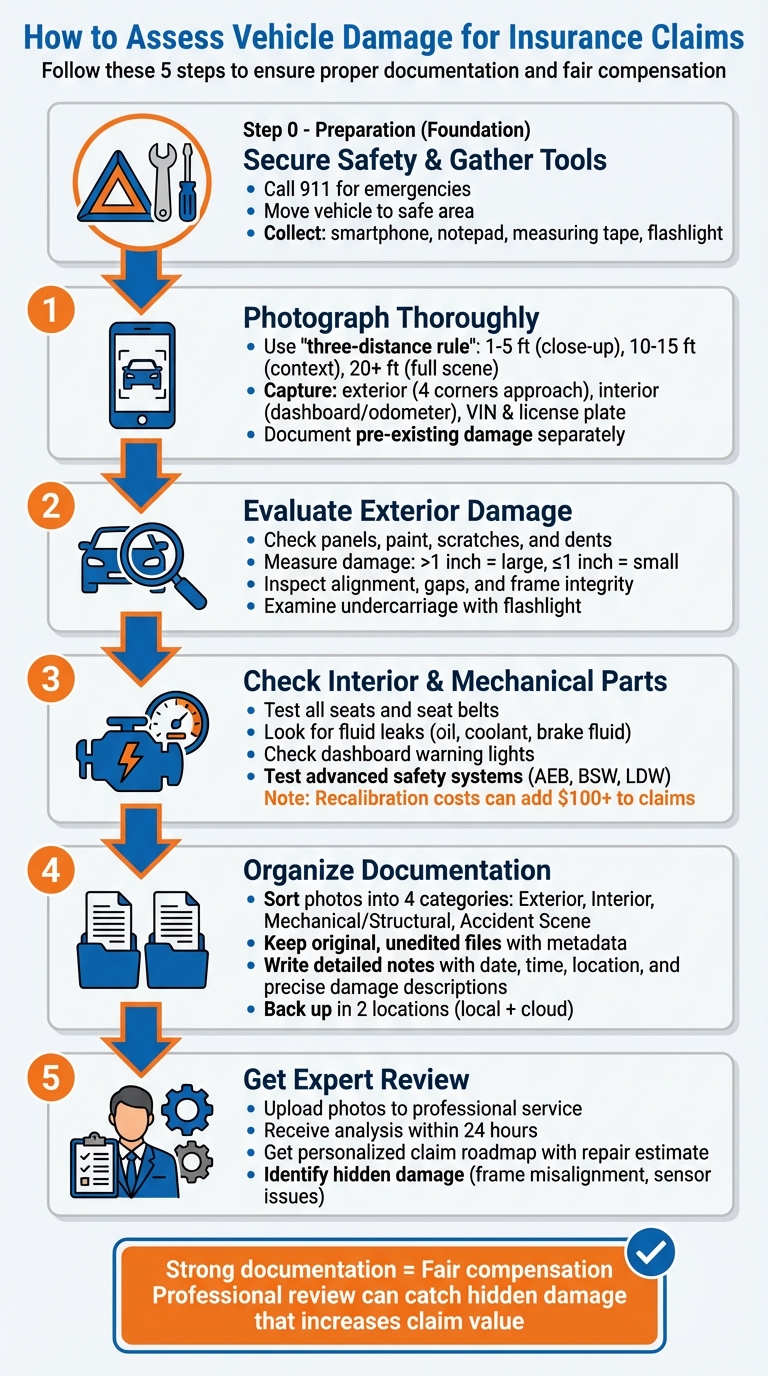
- Safety First: Secure the scene and move your vehicle to a safe area if possible. Call 911 for emergencies.
- Gather Tools: Use a smartphone, notepad, measuring tape, and flashlight for documentation.
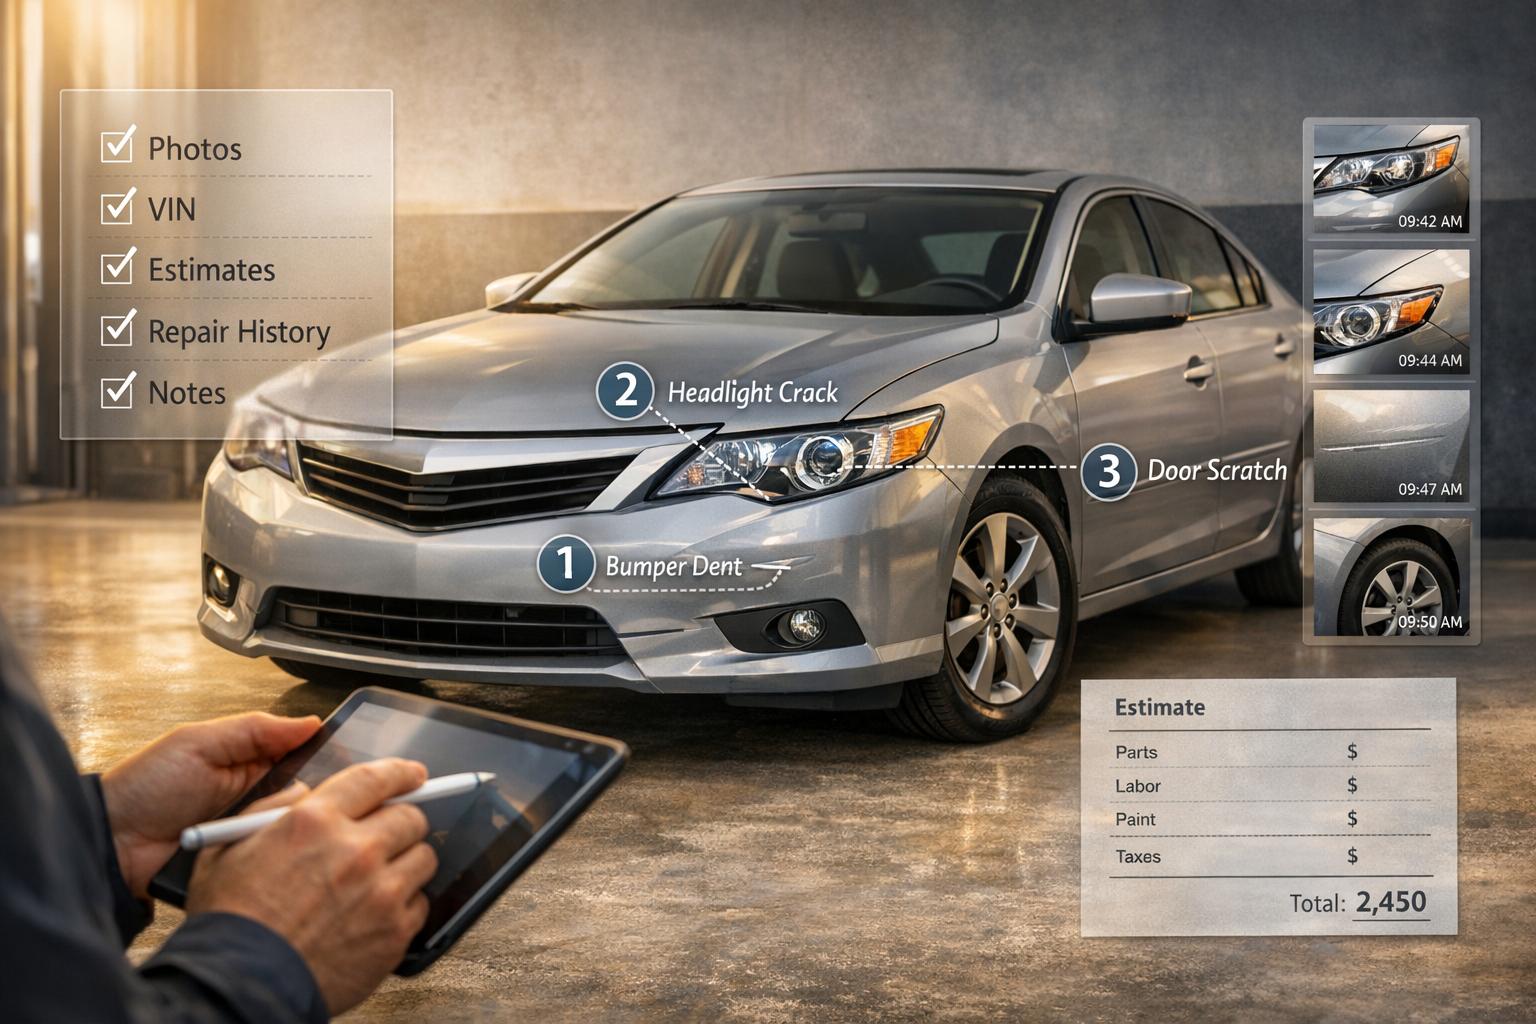
- Take Photos: Capture damage using the "three-distance rule" (close-up, mid-range, and wide shots). Include the VIN, license plate, and odometer.
- Inspect Thoroughly: Check the exterior, interior, and mechanical parts for visible and hidden damage. Look for misaligned panels, fluid leaks, or damaged safety systems.
- Organize Evidence: Sort photos into categories (e.g., exterior, interior) and back them up digitally. Add detailed notes about the incident and damage.
- Seek Expert Review: Professional assessments can identify hidden problems and strengthen your claim.
Proper documentation can make all the difference in securing the settlement you deserve, even if you need to dispute a total loss valuation.
5-Step Vehicle Damage Assessment Process for Insurance Claims
Preparing to Assess Your Vehicle Damage
Secure Your Safety and Stabilize the Vehicle
Your first step after an accident is to ensure everyone's safety. Check for injuries, and if anyone is hurt - or if there are hazards like leaking fuel or overturned vehicles - call 911 immediately. As Charles R. Gueli, Esq., a Licensed Attorney, advises:
"The first priority after an accident is to call 911 for help. Tell the dispatcher if you or anyone else is hurt, if there are dangers at the scene like leaking fuel or overturned cars, or if there are traffic problems."
If your vehicle is still drivable and it’s safe to do so, move it out of traffic. Turn on your hazard lights and park in a secure, well-lit area. For minor accidents without injuries, you can use your local police department's non-emergency number instead of 911. If the vehicle is on fire, do not approach it - move away, staying downwind, and contact the fire department immediately.
When the police arrive, let them secure the scene before you start assessing the damage. This ensures the area is safe for you to begin documenting the incident thoroughly.
Collect the Necessary Tools
To properly document the damage, gather some basic tools. A smartphone or camera is essential for taking clear, high-resolution photos. Bring along a notepad and pen to sketch diagrams or jot down witness accounts. A measuring tape can help you note the size of any dents or scratches, and a flashlight is useful for checking areas like the undercarriage or under the hood.
It’s also smart to keep a phone charger in your glovebox. If writing isn’t convenient, use a voice memo app to record details like weather conditions, road conditions, and the direction of travel. Having these tools on hand allows you to document everything right away, which can help speed up the insurance claims process.
sbb-itb-6a9d141
Auto Appraisal Photos you MUST Know
Step 1: Photograph the Vehicle Thoroughly
Once the scene is secure, your next move should be to gather solid evidence of the damage. The best way to do this? Take photos - lots of them. According to Leah Hancock, Material Damage Reinspector at Erie Insurance:
"Photos can be the best evidence for showing how an accident happened. They also help you remember specifics about how the accident occurred."
To give insurance adjusters the clearest view, follow the "three-distance rule." Take photos from 1–5 feet for close-up details, 10–15 feet for context, and 20+ feet to capture the full scene [13, 16]. Use your smartphone or camera, and if you have a measuring tape handy, include it in the shots to provide scale.
Photograph the Exterior
Start with the basics: a "four corners" approach. Take photos from about 7 feet away of the left front, right front, right rear, and left rear. Make sure each shot includes one full side and one end of the car. IA Path explains:
"The 4 corners allows anyone who looks at the photos to see the overall condition of the car. Many times you will be able to see a majority of the damage, license plate, and prior damage all from just the 4 corners."
Next, focus on damaged areas. Use damage triangulation by taking one photo head-on and two more from the left and right angles. For dents or crushed sections, stand directly above the damage and take a photo at a 90-degree angle to show depth. Always include the license plate in your shots, and if possible, use a measuring tape to highlight the size of the damage.
Photograph the Interior
Move inside the car and start with a shot of the dashboard, making sure the odometer is clearly visible [14, 15]. This helps establish the car's mileage at the time of the accident. High mileage is one factor in how insurance calculates total loss values. Don’t stop there - document any deployed airbags, cracked dashboards, damaged controls, or torn seats. Pay attention to smaller details, like the headliner, sunroof, and driver-side door trim, as these give a fuller picture of the car’s condition [14, 15].
Photograph Additional Details
Don’t forget the essentials like the VIN, which you can find on the dashboard or the driver’s door pillar [14, 15]. Get a clear shot of your license plate too. If your car had any pre-existing damage - like old scratches, dents, or paint chips - photograph those separately and make a note that they’re unrelated to the current accident [4, 17]. This can protect you from being blamed for prior issues.
Chris Andreoli, Corporate Claims Process Director at Progressive Insurance, emphasizes why this step is so critical:
"The importance of photo documentation is huge... It makes everyone's jobs much easier when it comes time to answering questions when shops diligently document all damages with quality photos."
Step 2: Evaluate Exterior Damage
Once you've taken your photos, it's time to dive deeper and examine the extent of the damage. This step helps you uncover not only what's visible but also potential hidden issues that might not be immediately obvious.
Check Panels and Paint
Start by running your hand along the car's body panels and corners. If you feel any unevenness or bumps, it could mean filler was used in previous repairs. Next, crouch down to eye level and look along the car's side. The body lines should appear straight and consistent. If the paint reflections look distorted or wavy, it might indicate that panels have been hammered out or replaced.
Take note of scratches and dents. For scratches, try the fingernail test - run your fingernail over the scratch. If it catches, the damage goes deeper than the surface. For dents, measure their size with a tape measure. Damage larger than one inch is considered “large,” while anything one inch or smaller is “small”. Also, differentiate between dings (small dimples that don’t affect the surrounding metal) and dents (larger depressions). Look for signs of previous repairs, such as paint transfer, sanding marks, or texture differences, especially along door edges.
Don’t overlook the bumper cover. Many modern bumpers are made from semi-rigid plastic, like polypropylene, which can bounce back into shape after an impact. However, the foam or plastic energy absorber and the reinforcement bar behind the bumper might still be damaged. General Motors highlights:
"Because the energy absorbers are relatively low in cost to replace, it is now more cost efficient to replace the energy absorbers whenever they are damaged."
Inspect Alignment and Frame Integrity
Check the gaps between doors, the hood, the trunk, and adjoining panels. These gaps should be even from top to bottom. If they aren’t, or if panels don’t sit flush, it could signal misalignment or structural problems. Make sure the hood, doors, and trunk open and close smoothly. If they feel stiff or sit unevenly, it might point to a shifted frame.
For a closer inspection, grab a flashlight and look at the undercarriage. Check for cracks, bends, or crumpling in the chassis and wheel wells. To confirm the frame’s alignment, measure diagonally from one corner to the opposite corner. Unequal measurements mean the frame is no longer squared. As Steve Tanner from U.S. News explains:
"Structural issues following collisions are more common due to the 'unibody' construction that most cars now employ to ensure greater safety by distributing the force of the collision."
Step 3: Check Interior and Mechanical Parts
Once you've assessed the exterior, it’s time to examine the interior and mechanical components for any hidden issues that could affect safety or your insurance claim.
Look for Interior Damage
Start by sitting in every seat and adjusting them. Pay attention to any irregularities in their positioning - this could signal frame damage. For instance, in a 2021 case, a driver discovered a bent seat frame following a severe rear-end collision, highlighting the importance of testing seat adjustments.
Next, inspect the seat belts. If airbags deployed during the accident, the seat belts may need replacing due to stress on their tension mechanisms and webbing. Look for signs like fraying, stretching, or other damage. Additionally, check carpets and upholstery for dampness or mold, which might indicate water damage. According to Consumer Reports:
"water damage frequently results in a total loss, as it can become worse over time as wiring and metals corrode, and mold can develop in carpet and upholstery"
Don’t overlook the dashboard - check for cracks, loose vents, or malfunctioning gauges that could hint at deeper issues.
Inspect Under the Hood
Pop the hood and take a close look for any fluid leaks, such as oil, coolant, or brake fluid. Be sure to check both the engine bay and the ground underneath the vehicle. Examine the battery for cracks and ensure all electrical connections are secure. Belts and hoses should also be inspected for any signs of wear, such as fraying, slipping, or breaks, as these could lead to engine problems. Watch for severed wires or signs of overheating, like smoke or damaged components. After checking these mechanical elements, test all electronic systems to ensure they’re functioning properly.
Test Advanced Systems
Modern vehicles rely heavily on advanced systems like Automatic Emergency Braking (AEB), Blind Spot Warning (BSW), and Lane Departure Warning (LDW). These sensors and cameras are often located behind bumpers, inside windshields, or within side mirrors, making them vulnerable to even minor impacts. As ASE-certified mechanic Frank Leutz points out:
"Just because a dash light isn't on doesn't mean no codes were tripped as a result of the collision, and you can only get access to those DTCs by running the vehicle through a scan"
Check the dashboard for any warning lights related to airbags, brakes, or safety systems. If the vehicle pulls to one side despite proper alignment, it could mean the cameras need recalibration. Avoid testing active safety features, such as collision avoidance systems, on your own - these require specialized diagnostic tools. Keep in mind that vehicles equipped with advanced safety technology often have higher insurance claims, with recalibration costs adding more than $100 compared to vehicles without these systems.
Step 4: Organize Your Documentation
Once you've gathered your photos and notes, the next step is to organize everything in a way that adjusters can easily review. A clear and well-structured presentation of your evidence can make all the difference, helping adjusters quickly understand the extent of the damage. On the flip side, sloppy organization can slow down the entire claims process.
Sort and Label Your Photos
Start by dividing your photos into four main categories: Exterior Damage, Interior Damage, Mechanical/Structural Issues, and Accident Scene/Environment. Within each category, arrange the images logically - begin with wide-angle shots for context, then move to close-ups for detailed views. Don’t forget to include identification photos, such as the VIN and odometer reading, taken immediately after the incident.
Keep your photo files in their original, unedited state. As Insurance Panda emphasizes:
"The safest approach is to store originals digitally and keep at least two backups (for example: one on your phone/computer and one in the cloud)."
The metadata embedded in these files - like timestamps and location data - serves as critical proof of when and where the damage occurred. To keep everything secure, create a dedicated digital folder for your claim and back it up in two places: one on a local device and another in the cloud.
Once your photos are sorted, focus on adding detailed, well-organized notes to enhance your documentation.
Write Clear Notes
While photos are essential, your notes provide the context that images alone can't convey. Start by recording the date, time, and location of the incident as soon as possible. Include specific environmental details, such as weather conditions, road quality, and lighting at the scene. Avoid vague descriptions - precision is key. For example, instead of writing "the front is damaged", follow the advice from Painted OEM Parts:
"Instead of saying 'the front is damaged,' say 'the front bumper has a 6-inch crack extending from the driver's side fog light housing.'"
Also, document operational issues like fluid leaks, odd noises, or warning lights. Keep a detailed log of every interaction related to your claim, including calls and emails, noting the dates, names, and summaries of conversations. As you write your notes, work systematically from one end of the vehicle to the other to ensure no area is overlooked.
Step 5: Get Expert Review of Your Assessment
Once you've carefully photographed and documented your vehicle's damage, having an expert review your assessment ensures nothing important is missed. While your own evaluation is a great start, professionals can spot issues that aren't immediately visible. For instance, structural damage, internal mechanical problems, or issues with advanced safety systems often go unnoticed in self-assessments. By getting an independent expert to examine your documentation, you increase the chances of securing a fair insurance claim outcome. Their trained eye can detect hidden problems that might otherwise slip through the cracks, building on the foundation of your organized records.
Upload Photos to Collision Help
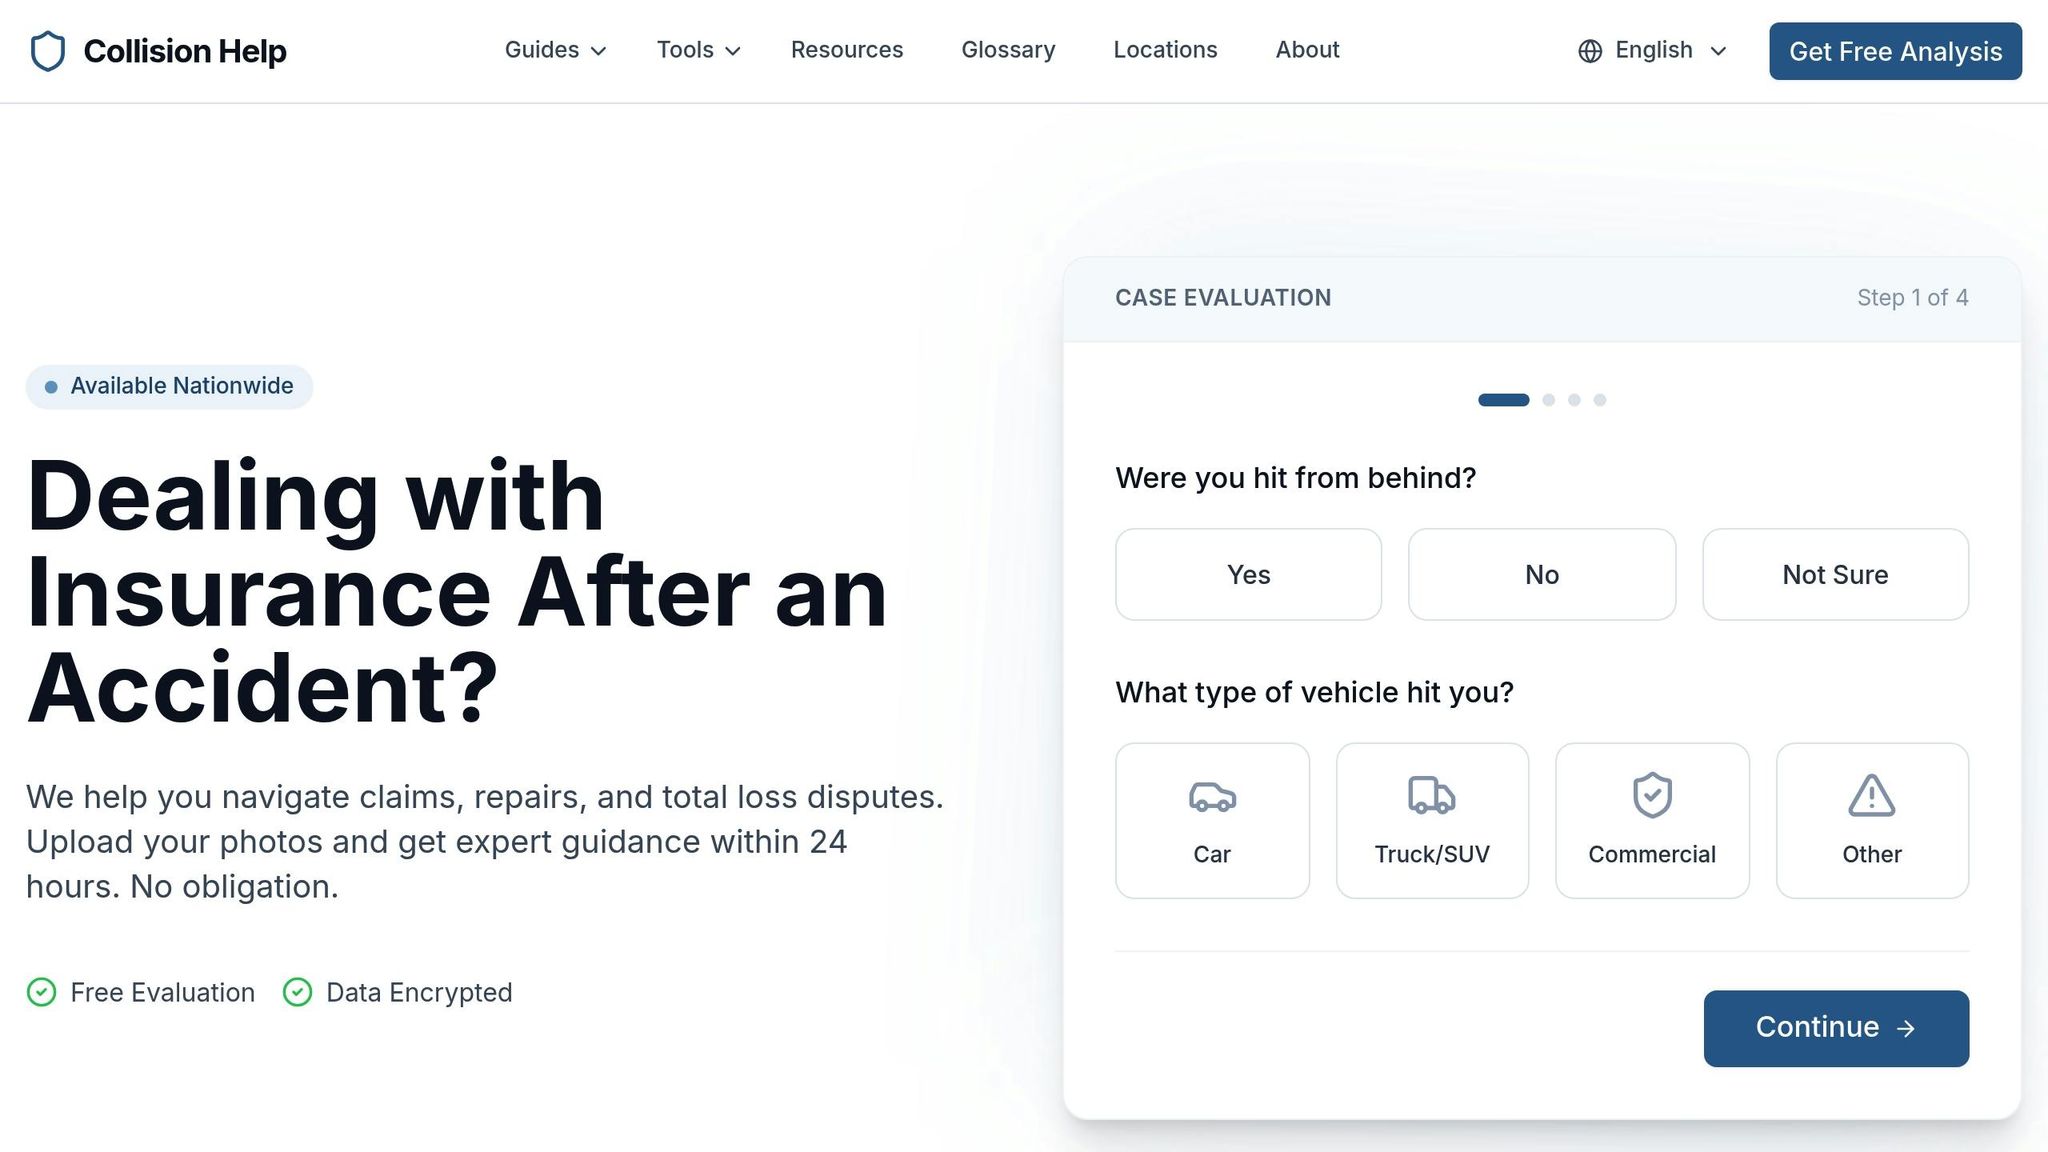
After organizing your documentation, you can upload your photos to Collision Help | Nationwide Accident Help through their secure online portal. This service offers expert analysis within 24 hours. To get started, submit wide-angle shots of the accident scene, close-up images of the damage, and photos showing your VIN and license plate. For added peace of mind, the platform uses encrypted technology to protect your personal and vehicle data - offering better security than standard email.
Before uploading, take a moment to clean any dirt or debris from the damaged areas to ensure the photos are clear. Well-lit, sharp images make it easier for experts to assess the damage accurately. The upload process is quick, typically taking just 10–20 minutes, and it also provides you with a secure digital backup of your documentation.
Get Your Personalized Claim Roadmap
Once the expert review is complete, you'll receive a detailed analysis outlining all visible damage and flagging potential hidden issues, such as frame misalignment or sensor malfunctions. This diagnostic report includes a repair estimate, a total loss evaluation (if applicable), and step-by-step instructions for navigating your insurance claim.
This professional assessment can be a game-changer if your claim is undervalued. You'll have written documentation to support a request for a supplement or to challenge an insufficient settlement. Plus, if your repair shop later identifies additional damage not covered in the initial estimate, the expert can assist in ensuring the insurance company files a supplement for those extra repair costs.
Conclusion
Following these steps ensures a thorough vehicle damage assessment. Start by prioritizing safety, take detailed photos, evaluate all visible damage, and organize your documentation to create a solid foundation for your claim. As Spray Shack Ltd emphasizes:
"Your strongest ally is the quality of your documentation."
Clear and detailed records can significantly reduce disputes during the claims process.
The final step? Get a professional review of your assessment. Some damage, like frame misalignment, fluid leaks, or electrical issues, can go unnoticed during a basic inspection. Services like Collision Help | Nationwide Accident Help provide expert, 24-hour analysis to enhance your evidence. Their detailed report highlights all visible damage, flags potential hidden issues, and includes a repair estimate, total loss evaluation (if needed), and step-by-step guidance for handling your insurance claim.
With expert-reviewed documentation in hand, your claim becomes much stronger. This approach not only speeds up the claims process but also lowers stress and increases the likelihood of fair compensation. Strong evidence can help counteract any bias from the insurance adjuster, putting you in a better position to receive what you deserve.
FAQs
How can I spot hidden damage to my car after an accident?
Hidden damage after an accident can be hard to spot, but there are some clear warning signs you shouldn't ignore. For example, if you notice trouble opening or closing the doors, trunk, or hood, this might point to structural misalignment or frame damage. Other red flags include uneven gaps between panels, odd noises when driving over bumps, or the car pulling to one side - these could signal issues with the frame, suspension, or other internal systems.
Take the time to thoroughly inspect your vehicle and make a note of anything unusual. If something feels off and you're not sure what's wrong, reach out to a trusted auto repair professional or your insurance adjuster. Identifying all damage early can save you from unexpected headaches and help ensure a smoother claims process.
What’s the best way to take photos of vehicle damage for an insurance claim?
To make sure your photos properly capture vehicle damage for an insurance claim, keep these tips in mind:
- Take clear, well-lit photos from multiple angles. Include shots from all four corners of the vehicle and close-ups of the damaged areas to capture every detail.
- Place a measurement tool - like a ruler or tape measure - in close-up shots to give a sense of the damage's size.
- Make sure your photos are sharp and in focus, avoiding glare or shadows that could hide important details.
- Include wide shots of the entire vehicle to provide context, along with detailed images of the specific damage.
These steps will help you create precise documentation, making the claims process smoother and ensuring accurate evaluations.
Why should I get a professional assessment for my vehicle damage after an accident?
Getting your vehicle damage professionally assessed is a smart move when you're filing an insurance claim. These experts can spot not only the obvious damage but also hidden issues that might escape your notice. This ensures that all necessary repairs are included in the claim.
It's worth remembering that insurance adjusters represent the insurance company, not you. An independent evaluation can help protect you from undervaluation and ensure you receive the compensation you're entitled to. This becomes even more critical if the accident caused significant damage or involves expensive repairs.